Sunday, February 27, 2011

Spiced Chickpea Tomato Soup


What another lovely snowy day it was today.  (Okay, so that was a completely sarcastic statement.)  Living in lovely Massachusetts means you never know exactly what to expect from the weather around here.  So that means the "rain or snow" that we were supposed to get today inevitably ended up being, snow.  Wahhhhhhh!  (Yes, that is supposed to be said using the Snooki voice)  This winter has been an exceptionally rough one for us here and quite frankly, I. am. so. freakin'. sick. of. it!  But, apparently mother nature doesn't really care what I think..so she brought on more snow than we expected, again.  Lucky for me this is the best kind of day to spend cooking (plus I was also off from work today), so after finishing up at the gym, I had a long day in the kitchen planned.  I had quite a few things in mind, but I ended up scrapping a couple ideas for now and decided to add this soup to today's line-up instead.  It seemed like the perfect thing to make to accompany a day like today.

After spending a few hours of cooking and cleaning, I decided to take a little break so Dave and I could take Tucker to a local park to run around in the snow.  It's a good thing at least one of us likes this weather!  As much as I whine about the snow (which is just about every single day), it was a nice way to try to enjoy what we have to deal with.  Plus, it was nice to watch Tucker run around and enjoy himself since he's been cooped up inside a lot this winter.  After letting him get some energy out and becoming slightly frozen ourselves, we headed back home and I was more than in the mood to dig into this soup.  Once we got in, I made some grilled "cheese", heated up the soup, and can say I actually enjoyed this crazy New England weather for once.

Now, a little about the soup.  The flavors in this are very warming and comforting, which truly makes this a perfect winter meal.  The red pepper and spices really transform this into an aromatic dish that packs a lot of punch to it.  Don't be fooled though, this really isn't your typical "light" soup.  It's extremely hearty and rich from the pureed chickpeas, which add a lot of body to it.  Basically, it's damn good and you should give it a go!

Tucker and me in a little tunnel at the park. 
(Don't mind my appearance, I was unshowered post-gym. TMI?  Oh well!)


We had found a little broken sled while we were out.  Needless to say, despite all of Tucker's muscle mass, I don't quite see him having a future with the Iditarod.  And he sure loves wearing his backpack!

Spiced Chickpea Tomato Soup
Serves 4; makes about 6 cups

Ingredients:
  • 3 garlic cloves, minced
  • 3 dried hot red chiles, chopped, or 1/2 teaspoon red-pepper flakes
  • 1 teaspoon ground coriander
  • 3/4 teaspoon coarse salt
  • 1/8 teaspoon caraway seeds
  • 2 tablespoons extra-virgin olive oil
  • 1 can (15 ounces) chickpeas, drained and rinsed
  • 1 1/2 cups crushed canned tomatoes, with juice
  • 1/2 cup drained jarred roasted red peppers, rinsed
  • 3 1/2 cups homemade or store-bought vegetable stock
  • (Vegan) Sour cream, for serving
  • Parsley sprigs, for garnish


Directions:

  1. Using a mortar and pestle or the back of a spoon, crush garlic, chiles, coriander, salt, and caraway to form a paste.
  2. Heat oil in a saucepan over medium-high heat. Add garlic mixture, and cook until just softened, about 3 minutes.
  3. Stir in chickpeas, tomatoes, roasted red peppers, and stock. Simmer, stirring often, for 15 minutes. Let cool slightly.
  4. Working in batches, puree soup in a blender. Rewarm if necessary. Divide among bowls, and top each with a dollop of sour cream and a sprig of parsley.
  5.  
    Note:  To do the "swirl", water down 2 tablespoons (vegan) sour cream with one tablespoon water.  Put mixture into a plastic bag, snip the bottom corner and carefully swirl, make a heart, or whatever shapes you please!  And, I absolutely adore my little porcelain soup containers in this picture.  In case you may be wondering, I got them at Crate & Barrel.  Reasonably priced and super cute!  You should probably go get some.
Source: Martha Stewart

Saturday, February 26, 2011

Somoa Girl Scout Cookies


Girl Scout Cookie season is such a wonderful time of year, dontcha think?  Growing up, I never really had a desire to become a Brownie or a Girl Scout, but boy did I looooove eating their cookies.  I honestly can't say I have a definitive favorite between all of them, but if you were to put a box of Samoas (AKA Caramel deLites), Thin Mints, and Tagalongs (AKA Peanut Butter Patties) in front of me and told me to choose my favorite of the three I would probably....grab them all and run!  Those are definitely my top three picks, but there are different things about each of them that I absolutely love, so I can't really say which one I prefer over the others.  Unfortunately this indecisiveness leads me to buying one of each box when it is the season for Girl Scout Cookies.  It's just so hard to say no when I walk by the girls on my way into work!  They really know how to push those things.  And, considering I live with a human garbage disposal, I had to go back and buy seconds because I didn't get to enjoy even one the first time around!  Good thing I found a hiding place for these ones... :) 

 As delicious and irresistible as they are, I knew I had to stop splurging on them for my poor wallet's sake (buying a box is one thing, but once you're onto your 5th or 6th one, fuhhgedaboutit..make your own!).  Coincidentally, I happened to stumble upon a link to homemade Somoas one day and vowed that the second I got in from work that day, I would make them.  There really are some perks to working in a bank that's inside of a grocery store, afterall.  Once I ran through the aisles in excitement and grabbed everything I needed, I headed home to make magic.  (well, Somoas...but you should know they basically are magical!)  Surprisingly, these really weren't hard to make.  They do require a little bit of time and love, but judging by the outcome, they are definitely worth it.  I was able to get 24 perfect shortbread cookies out of this recipe...not to mention they were about twice the size of the originals!  Aside from the shortbread being a little thicker, they really taste just like the ones you buy from the cute little girls.  And this way, instead of having to buy stock up on an emergency supply to resort to when they aren't in season, try this recipe out instead!  They are seriously delicious...maybe I'll even try going door to door selling some.  I may not be as cute as those little girls are, but I surely can provide a cookie that's almost just as good as the real thing. :)

So, you're not much of a coconut or caramel fan, you say?  Do you happen to prefer another type of Girl Scout cookie over the Somoa?  Well, lucky for you, I will be taking a whack at some more homemade versions.   I was lucky enough to try a veganized version of the Thin Mint that Dave's sister over at Vegan Food Rocks made last week..so I will be sharing the homemade and the vegan homemade versions of that little cookie with you soon.  Stay tuned!


Yields: 
24 1 1/2 inch Cookies


Ingredients for cookie:
  • 1 cup softened butter
  • 1/2 cup sugar
  • 2 cups all-purpose flour
  • 1/2 teaspoon salt
  • 1/4 teaspoon baking powder
  • 1/2 teaspoon vanilla extract
  • 1 tablespoon milk

Ingredients for topping:

  • 3 cups shredded coconut
  • 12 ounces of caramels
  • 1/4 teaspoon salt
  • 3 tablespoons milk
  • 8 ounces chocolate chips

Directions for Cookie:
  • Preheat your oven to 350 degrees. While the oven is preheating, begin by mixing the butter and sugar together in a large mixing bowl.
  • Next, add in the flour, salt and baking powder.
  • Finally, add the vanilla extract and milk and incorporate well.  (I found kneading it with my hands was the fastest and most effective way!)
  • Lightly flour your rolling pin and roll the dough out (on top of parchment paper so it doesn't stick to the table). Make sure it is about 1/4 of an inch thick.
  • Using a small, round cookie cutter, begins cutting out the cookies.  (I didn't have one small enough, so I used the top of a drinking glass and it was the perfect size!)
  • Cut as many cookies as you can (it's really easy dough to work with so just re-roll it out as much as you can.  I was able to get 24 cookies from it)
  • When placing on the cookie sheet, to fit more at a time you can place them close together.  The shortbread doesn't expand much while cooking.
  • Next, cut a hole from the middles of the cookie using a straw, finger, knife, etc.  (I improvised and used the top of a water bottle cap and it was the perfect size.  I ended up covering the hole with the topping, but it did allow me to get a few extra cookies out of it!)
  • Bake for 10-12 minutes.  Don't let them brown too much.  They may still feel soft after this amount of time, but still pull them and let them cool.  They will harden up a little while cooling, but you still want them to be soft. 
  • While baking you will want to start the ingredients for the topping.

Directions for Topping:
  • Unwrap the caramels. Place in a bowl with the milk and salt and microwave for about 3 minutes stirring occasionally (length of time depends on the power of the microwave).  You can also do this step on the stove top if you prefer.
  • Next, spread the coconut on a baking sheet and toast in the oven for about 15-20 minutes. Stir it every 3-5 minutes. 
  • Fold the coconut into the caramel mixture and stir well. 
  • Using a small spoon, place the mixture on top of the cooled cookies (about 2 tablespoons per cookie). (In order to keep the mixture from sticking to my hands, I lightly wet them and then spread the topping over the cookie)
  • Finally, melt the chocolate in a small bowl in the microwave (or on the stove top, again preference). Heat for about 30 seconds then stir, and repeat until melted completely. 
  • Dip the base of the cookies into the chocolate and place onto parchment paper. Once all cookies have been dipped, place the remaining chocolate into a zip block bag and cut a small hole in the corner. Pipe the chocolate onto the cookie in a zig-zag pattern.
  • Place in the refrigerator for about 5 minutes to allow the chocolate to harden.
Now, after all of your hard work through all of these little steps..you finally have your own homemade Girl Scout Somoa/Caramel deLites!

Adapted from: A Bicycle Built for Two
(There are great step-by-step photos on this link!)

For a vegan version of this classic, click here! You can also purchase "Vegan Cookies Invade Your Cookie Jar" for this recipe and tons of other delicious vegan cookies.  Yum!

Thursday, February 24, 2011

Spicy Black Bean Burritos


It's been a few days since my last post and it's not that I don't have anything delicious to share, but my body and brain have both been very tired from the 10 hour shifts at work (along with taking care of a home and playing zoo-keeper with my animals).  I honestly don't know how people do it everyday (not to mention with kids, too)!  Maybe it's something you get used to with time, in which case I really hope that I get used to it soon. I am so thankful to have this semester off from school or else I probably never would have never had the time to start my little blog baby which I love and care very, very much about.  Which is why I do not want to post unless the reading and recipe are worthwhile.  And in this case, I feel I have fulfilled both requirements!  Aside from me whining just a little...  

I'm not quite sure what came over me the other day, but I had a serious hankering (I think I'm one of the few out there who would shamelessly use that word) for a burrito the other day.  I absolutely LOVE them, but I haven't exactly mastered how to eat one gracefully.  I'm thinking it's probably a good thing Dave didn't take me out for Mexican on our first date, because if that was where he got his first impression of me, he probably wouldn't have ever called me back to go out a second time.  Lets just put it this way, calling me "messy" is a complete understatement.  Whenever I eat a burrito, it reminds me of the scene from an old Mary-Kate and Ashley Olsen movie called "It Takes Two" where one of the girls, Alyssa, eats her first sloppy joe and her face gets absolutely covered with it.  I'll admit, I'm a close runner up to her, but I do try to be somewhat ladylike when I eat one.  But honestly, I can't even be bothered to use a napkin until I'm done because somehow I am capable of getting it everywhere.  I always manage to get my hands and face completely covered in yummy burrito goodness, but hey..that's the fun of it, right?  Attractive, I know.

I have never made my own burritos because I figured I should leave it to the pros at Moe's (my favorite!) but unfortunately there aren't any very local to where I live, and I wanted one, bad...so I decided to take the plunge and try them myself.  I have to say, I was definitely impressed and extremely satisfied with how awesome they came out!  I had it for dinner one night, and lunch the following three days.  I didn't even get sick of it of it once...but unfortunately I finished it all and am sad that it is now gone.  There is so much flavor squeezed inside and all of the components just compliment each other perfectly.  And they are definitely a great thing to just wrap up and save for dinner after a long day.  But I should probably warn you to not be wearing something nice when you eat them if you're messy like me...but if you must dress to impress, my suggestion is to invest in a big ole' bib.  That's at least slightly more attractive than burrito-face! 

Yield: about 6 servings
Ingredients:

For the bean filling:
  • 2 tsp. canola or vegetable oil
  • 2 cloves garlic, minced or pressed
  • 1 tsp. chili powder
    • 1 tsp. ground cumin
    • ¼ tsp. kosher salt
    • Dash cayenne pepper
    • 1/3 cup water or vegetable broth
    •   2 (15 oz.) can black beans, drained and rinsed
    • 6 tbsp. fresh salsa

    For serving:
    • 6 (9- or 10-inch) flour tortillas, warmed
    • Shredded cheese (optional)
    • Diced tomatoes
    • Shredded romaine lettuce
    • Chopped green onions
    • Sour cream, Greek yogurt, or Tofutti Better than Sour Cream
    • Guacamole
    Directions:
    • To make the bean filling, heat the oil in a skillet over medium-high heat.  Add the garlic, chili powder, chipotle, cumin, salt and cayenne; stir, cooking just until fragrant, 30-60 seconds.  Add the beans and the water or broth to the pan.  Bring the mixture to a boil.  Reduce the heat to medium-low and allow the mixture to simmer for 10 minutes.  Remove the skillet from the heat, stir in the salsa and lightly mash the mixture with a spoon or fork.
    • Spoon about a third of a cup of the bean mixture down the center of each tortilla.  Top each serving with a pinch of shredded cheese, tomatoes, lettuce, green onions, guacamole, and sour cream.  Roll the tortilla up tightly, burrito style, and serve immediately.
    Adapted from: Annie's Eats


    Sunday, February 20, 2011

    Chocolate Chip Scones


    So this weekend was the boyfriend's birthday and along with making the quintessential birthday cake, I also wanted to make something super delicious for him for breakfast.  He's been working a lot lately and enjoyed having this time sleep in, so that meant I had to plan what I made accordingly.  So after cleaning up a bit, decorating the living room, and putting his presents out, I thought it would be nice to have something ready for him to eat right when he woke up. The problem was that I had no idea when that would be.  And, well, in my opinion, cold eggs and cold pancakes don't really scream "Happy Birthday! I love you!"  So instead I dug through my brain a little bit and remembered seeing some really, really yummy looking scones while I was perusing countless recipes online (as per usual).  It was decided--these were the perfect answer.  And even better, the birthday boy completely agreed.  These were good.  Sah-weet!  

    I had never made scones before and I actually haven't had them many times despite drooling every time I see them.  I'm big on Starbucks and whenever I go in my eyes are always drawn to their huge display of danish and pastries just sitting there looking all welcoming and ready to be eaten.  The thing is, I'm a little weird about certain foods and shy away from eating those types of things unless I make them myself and know exactly what has been put in them.  (Plus, my beloved soy latte is pricey enough as it is without adding anything else to my bill!)  Luckily, I happen to think it's way more fun to try making things yourself.  So, I went for it.  And I was definitely very pleased with the outcome.  Soft, flaky, and mega chocolatey.  Not necessarily the healthiest start to your day, but who really cares about that when it's a birthday/weekend treat?  Dave sure didn't, and I sure didn't mind partaking in my own scone (or two) with him either.  I definitely can't wait to try making other variations of them!


    Chocolate Chip Scones:


    Ingredients:

    • 2 cups (260 grams) all purpose flour
    • 1/4 cup (50 grams) granulated white sugar
    • 1 1/4 teaspoon baking powder
    • 1/4 teaspoon baking soda
    • 1/4 teaspoon salt
    • 1/2 cup (113 grams) (1 stick) unsalted butter, cold and cut into pieces
    • 1/2 cup (90 grams) milk or semi sweet chocolate chips or chunks
    • 1/2 cup (75 grams) dried cherries or cranberries (optional)
    • 1 teaspoon pure vanilla extract
    • 2/3 - 3/4 cup (160 - 180 ml) buttermilk

    • To veganize, simply replace the butter with some Earth Balance and the buttermilk with soy milk!


    Directions: 

    • Preheat oven to 400 degrees F (200 degrees C) and place rack in middle of oven. Line a baking sheet with parchment paper.
    • In a large bowl, whisk together the flour, sugar, baking powder, baking soda, and salt. Cut the butter into small pieces and blend into the flour mixture with a pastry blender or two knives. (The mixture should look like coarse crumbs.)  Stir in the chocolate chunks (or chips) and dried cherries. In a small measuring cup whisk together the buttermilk and vanilla extract and then add to the flour mixture. Stir just until the dough comes together (add more buttermilk or flour as necessary). Do not over mix the dough.
    • Transfer to a lightly floured surface and knead dough gently four or five times and then pat the dough into a circle that is about 7 inches (18 cm) round and about 11/2 inches (3.75 cm) thick. Cut this circle in half, then cut each half into 4 pie-shaped wedges (triangles). Place the scones on the baking sheet. Brush the tops of the scones with a little milk.
    • Bake for about 15 to 20 minutes or until golden brown and a toothpick inserted in the middle comes out clean. Remove from oven and place on a wire rack to cool.
    Makes 8 scones.


    Note: I omitted the dried cranberries from the recipe.  And after allowing them to cool, I melted chocolate and drizzled it on top.  Not only pretty, but extra tasty too!


    Source: Joy of Baking

    Friday, February 18, 2011

    Red Velvet Cupcakes


    Would it be biased as a redhead to say that all great things are red?  (Okay, maybe that's a bit of an overstatement, but I do adore these cupcakes).  There's something about a red velvet cupcake that never fails to impress. They ooze sophistication, deliciousness, and it's pretty obvious that they are nice to look at (and obviously even nicer to eat).  I always get excited whenever I am asked to make these cupcakes for people; I honestly never get sick of them.  There's just nothing that really can compare to a classic like this.  And if you want my opinion (I apologize if you don't, because you're going to get it anyway!), a rich cream cheese frosting is a must when it comes down to making these.  The combination is unrivaled...and who honestly wants to mess with perfection!? 

    If you have never tried red velvet cake....you are seriously missing out.  I remember when I saw it for the first time and how intrigued I was. My first thought was, "I need to try it!"  And after falling in love, my second thought was, "I need to make it!"  It's amazing how a little food coloring really ups the "wow" factor of these cupcakes.  Personally, I like mine to have a bold red color to them like these ones, which contrasts quite nicely with the frosting.  You can keep them nice and simple or dress them all up for any occasion; whatever you choose they are extremely impressive, iconic, and a definite crowd-pleaser.  But, make sure you bring more than enough of these little cuties wherever you go...people will fight over who gets the last one!

     
    Red Velvet Cupcakes
    Yield: about 24 cupcakes

    Ingredients:

    For the cake:

    • 2½ cups cake flour
    • 1½ cups sugar
    • 1 tsp. baking soda
    • 1 tbsp. cocoa powder
    • 1 tsp. salt
    • 2 large eggs
    • 1½ cups vegetable oil
    • 1 cup buttermilk
    • 2 tbsp. (1 oz.) liquid red food coloring
    • 1 tsp. vanilla extract
    • 1 tsp. distilled white vinegar

    Directions:
    • Preheat the oven to 350° F.  
    • Line cupcake pans with paper liners.  
    • In a medium bowl, combine the cake flour, sugar, baking soda, cocoa powder and salt; whisk to blend.  
    • In the bowl of an electric mixer, combine the eggs, vegetable oil, buttermilk, food coloring, vanilla and vinegar.  Beat on medium speed until well blended.  
    • Mix in the dry ingredients on low speed and beat until smooth, about 2 minutes.
    • Divide the batter evenly between the prepared liners.  
    • Bake, rotating the pans halfway through baking, until a toothpick inserted in the center comes out clean, about 18 minutes.  
    • Let cool in the pans 5-10 minutes, then transfer to a wire rack to cool completely.

      For the frosting:

      Ingredients:
      • 8 oz. cream cheese
      • 5 tbsp. unsalted butter, at room temperature
      • 2 tsp. vanilla extract
      • 2½ cups confectioners’ sugar, sifted
      Directions:
      • To make the frosting, combine the cream cheese and butter in the bowl of an electric mixer.  
      • Beat on medium-high speed until well combined and smooth, about 2-3 minutes.  
      • Mix in the vanilla extract.  
      • Gradually beat in the confectioners’ sugar until totally incorporated, increase the speed and then beat until smooth.  
      • Frost cooled cupcakes as desired.
      Note:  Since I use a lot of frosting on my cupcakes, I increased the quantity of ingredients by 50% to frost 24 cupcakes.  

      Cupcakes adapted from: Annie's Eats

      Wednesday, February 16, 2011

      Molten Chocolate Lava Cake


      Ooh, you caught me!  I am currently ordering pants at least three times bigger than the size I wear now because I am seriously in love with making and devouring this cake.  It's amazing that this has so few ingredients and takes no time to whip up.  That's probably not a good thing in my case because it means I will be making it, a lot.  Looks like it's time to head to Home Depot and put locks on all the cabinets!  But if I were ever to do a thing like that, it would mean I wouldn't have any delicious posts for you to read, so being the selfless person I am..I will make the sacrifice for the good of the readers and chocolate lovers out there!  (I know, it's such a huge sacrifice to eat cake..poor me!)

      But honestly, you see versions of Lava Cakes on most every restaurant's dessert menu and it's just something that seems so decadent, indulgent, and impressive (which it is), so I never imagined it could be so easy to make.  I first decided to try this recipe after dinner the other night for my Valentine, and he ate it right up.  It was a really close call who licked their plate clean first.  I was so happy with the outcome that I made it again to share with you...then proceeded to eat it right up.  It was just as good as I remembered!  I apologize because I must be putting you all into sugar comas with my recent posts...I'm sure you don't mind all that much, but I'll follow up all the sweet with some savory, promise. :)

      PS: I'm obviously a total sucker for bokeh.  I'm sure you have noticed by now. 

      (On a side note, I tend to be an impulsive buyer, but this time I was very pleased with myself that I had purchased a few little porcelain ramekins from Target out of the blue and had everything on hand to make these ooey, gooey cakes.  I hope that helps if you are wondering where you can get a few for yourself!)


      Active time: 20 Minutes
      Total time: 35 Minutes
      Yields: 4 six-ounce cakes

      Ingredients:
      • 1 stick (4 ounces) unsalted butter
      • 6 ounces bittersweet chocolate, preferably Valrhona
      • 2 eggs
      • 2 egg yolks
      • 1/4 cup sugar
      • Pinch of salt
      • 2 tablespoons all-purpose flour 
      Directions:
      1. Preheat the oven to 450°. Butter and lightly flour four 6-ounce ramekins. Tap out the excess flour. Set the ramekins on a baking sheet.
      2. In a double boiler, over simmering water, melt the butter with the chocolate. In a medium bowl, beat the eggs with the egg yolks, sugar and salt at high speed until thickened and pale.
      3. Whisk the chocolate until smooth. Quickly fold it into the egg mixture along with the flour. Spoon the batter into the prepared ramekins and bake for 12 minutes, or until the sides of the cakes are firm but the centers are soft. Let the cakes cool in the ramekins for 1 minute, then cover each with an inverted dessert plate. Carefully turn each one over, let stand for 10 seconds and then unmold. Serve immediately.
      (Note:  I dusted mine with a little confectioners sugar after plating them.  Completely optional)

      Make Ahead:

      • The batter can be refrigerated for several hours; bring to room temperature before baking. 
      Source: Food & Wine

      Monday, February 14, 2011

      Itty Bitty Pink Velvet Sandwich Cookies


      Happy Valentine's Day to all!  I hope your day is filled with love and plenty of sweets.  My brain has been overflowing with ideas for this day and before I knew it, it was here!  With only a little time left to squeeze another cute and yummy treat in, I was inspired by Miss Sandra Lee and did a little semi-homemade baking because I couldn't resist the adorableness of these itty bitty baby sandwich cookies. 

      You see, I'm the type of person that you could put a huge plate of food in front of or a small plate of food in front of and would eat the whole thing either way.  I never liked to waste food, so now I try to stick to smaller dishes so I don't feel compelled to lick the whole thing clean and then have to roll myself to bed at the end of the day.  (But, no one ever said I couldn't go back for seconds!)  This inspired me to downsize the traditional sandwich cookie into a pint-sized version, still bursting with just as much sweetness and love.  This way you'll have more to share and less to feel guilty about. Not in the mood to share?  I also provided the information for the big boys. ;)

      Cookies:

      Ingredients:
      • 1 box vanilla cake mix
      • 2 eggs
      • 1/2 cup butter (room temperature)
      • 4 drops red food coloring
      Directions: 
      • Preheat oven to 350
      • Add cake mix, eggs, and butter to bowl and mix well (don't be alarmed, they are pretty tough to mix together)
      • Drop teaspoon sized balls onto a parchment paper lined cookie sheet about 2 inches apart (I used a melon baller and rolled them with my hands after)
      •  Bake for 8-10 minutes for the mini version (10-12 if you drop spoonful sizes for the larger version)

      Cream Cheese Filling 

      Ingredients:
      • 1/2 Cup butter, softened to room temperature
      • 1 8 oz. Package cream cheese, softened to room temperature
      • 1 1lb. Box of confectioner’s sugar
      • 1 tsp Vanilla 

      Directions:
      • In a mixer, cream butter, cream cheese and vanilla.
      • Gradually add sugar and mix until smooth.
      Makes about 40 cookies or 20 sandwich cookies (24 cookies or 12 cookie sandwiches for larger version)

      To assemble after letting the cookies cool, just put the filling into a plastic bag, snip the corner and pipe onto the flat size of one cookie.  Gently press another cookie on top and either decorate, eat, or share!  No matter what you do, definitely enjoy them.

      Adapted from: Bakerella

      Saturday, February 12, 2011

      Chocolate Lovers Cupcake


      Chocolate cupcake + chocolate frosting= say no more!  That's about all I need to hear before I begin stuffing my face.  But in this case, I needed to exercise extreme self control because this time these weren't for my belly.  These cute little cakes were for a very special Valentine's engagement party. Congrats Jan and Adam! When asked to make these I couldn't resist the opportunity to bake up some more smiles.  I've said it before, I'll say it again and again, nothing says love like a cupcake (especially a chocolate lovers cupcake!)  You certainly wouldn't have to ask me twice to sink my teeth into one of these little guys.


      This cake was unbelievably moist, rich, and all around perfect.  I figured I couldn't go wrong if I followed a 5-star recipe by Ina Garten.  This was a bit risky to try a new recipe when making so many cupcakes, but what can I say..I'm a daredevil (sort of...).  I couldn't have been happier with the outcome so if you're looking for a great chocolate cake recipe, let this be the last place you look. They are that good. If you do try these out, don't be alarmed when you start adding the wet ingredients to the dry...the batter will be very, very thin but that's how it's supposed to be!  I have to admit, I was a little nervous at first when I saw it, but they came out perfectly.  And after allowing a little time to cool and getting topped with chocolate frosting, these cupcakes became a choco-holics dream come true!

      Too much chocolate for you, you say?  (As if there could ever be such a thing!)


      This chocolate cake even tastes great when paired with a super easy and scrumptious vanilla frosting.  (I know, I know, you're probably thinking "Hey, we've seen this!" But I had to share this version with you too...they're just  too good to pass up!)


      And how freakin' adorable and awesome are those cupcake liners?  My mom happened to find them one day and I'm so happy she's such a thoughtful Mumma and picked them up, because I just love they way they look with the cupcakes.  Simple. Elegant. (and most importantly) Delicious.

      For the cupcakes: 


      Ingredients:
      • 1 3/4 cups all-purpose flour, plus more for pans
      • 2 cups sugar
      • 3/4 cups good cocoa powder
      • 2 teaspoons baking soda
      • 1 teaspoon baking powder
      • 1 teaspoon kosher salt
      • 1 cup buttermilk, shaken
      • 1/2 cup vegetable oil
      • 2 extra-large eggs, at room temperature
      • 1 teaspoon pure vanilla extract
      • 1 cup freshly brewed hot coffee
       Directions:
      • Preheat the oven to 350 degrees F. Spray cupcake liners with a non-stick spray.  Add liners to cups.
      •  Sift the flour, sugar, cocoa, baking soda, baking powder, and salt into the bowl of an electric mixer fitted with a paddle attachment and mix on low speed until combined. 
      • In another bowl, combine the buttermilk, oil, eggs, and vanilla. With the mixer on low speed, slowly add the wet ingredients to the dry. 
      • With mixer still on low, add the coffee and stir just to combine, scraping the bottom of the bowl with a rubber spatula. 
      • Using an ice cream scoop our tablespoon, spoon batter into the prepared pans (2/3 full) 
      • Bake for 18-22 minutes, until a cake tester comes out clean. 
      • Cool in the pan for 30 minutes, then turn them out onto a cooling rack and cool completely.

      Adapted by: Food Network 


      For the Chocolate Frosting:
      **(I was able to frost 24 cupcakes with this recipe)

      Ingredients:
      • 2 3/4 cups confectioners' sugar
      • 6 tablespoons unsweetened cocoa powder
      • 6 tablespoons butter
      • 5 tablespoons evaporated milk
      • 1 teaspoon vanilla extract
      (Note:  I used heavy cream instead of evaporated milk)

       Directions:
      • In a medium bowl, sift together the confectioners' sugar and cocoa, and set aside.
      • In a large bowl, cream butter until smooth, then gradually beat in sugar mixture alternately with evaporated milk. Blend in vanilla. Beat until light and fluffy. If necessary, adjust consistency with more milk or sugar.
      Adapted from: AllRecipes


      For the Vanilla Frosting:
      Makes enough for 30 cupcakes
      **(I was able to frost 24 cupcakes with this recipe)
      Ingredients:
      • 1 cup (2 sticks) unsalted butter, room temperature
      • 6 to 8 cups confectioners' sugar
      • 1/2 cup milk
      • 1 teaspoon pure vanilla extract
      (Note: I used heavy cream instead of milk)

      Directions:
      • In the bowl of an electric mixer fitted with the paddle attachment, cream butter until smooth and creamy, 2 to 3 minutes. 
      • With mixer on low speed, add 6 cups sugar, milk, and vanilla; mix until light and fluffy. 
      • If necessary, gradually add remaining 2 cups sugar to reach desired consistency.
      Adapted from:  52Cupcakes


      Tuesday, February 8, 2011

      Hummus Wrap

       
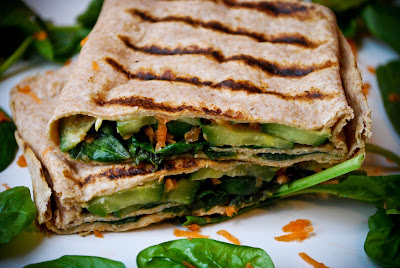
      If you were to look in my refrigerator at any given moment, you would find about 5 different hummus containers.  I should probably be on the show "Hoarders" just because of the amount of space they take up in the fridge (okay, that's a little dramatic, but it is like Hummus Central in there).  Dip it, spread it, spoon it (yes, I eat it off the spoon just like peanut butter), any of those options are fine by me. I honestly never knew such a thing existed until some years ago when I was at an old friend's family cottage.  She comes from a very big and extremely close Lebanese family and they always had hummus and tabbouleh around to feed the crowd.  Who knew something could taste so good when put on so many things!  Chips, veggies, sandwiches, the stuff never gets old which is why I adore it so much.  You are a wonderful thing, little chickpea.

      This wrap is a perfect quick and yummy lunch for those days that you're hungry and just don't want to or have the time to get your "gourmet meal" on.  This only has a few ingredients and that's really all it needs.  Sometimes the simplest recipes end up being long-time favorites, and that's definitely where this landed in my book.  I have been bringing this to lunch a couple times a week since I came across the recipe.  It's light, refreshing, and only takes a few minutes to make.  Perfect?  I think so!  It even gives me an excuse to use that grill pan of mine that I love to pieces.  (Now if only I knew how to work a real grill...)  The other great things is if the sandwich sits for a little the flavors combine and make it even tastier, but don't let it sit too too long or it will get pretty soggy. (I made that mistake, but it wasn't the end of the world..it still tasted great!)

      This is another awesome recipe from the blog VeganYumYum.  I just recently bought the book and I am so excited to start cooking from it!

      Yields Two

      Ingredients: 
      • 2 10″ Wheat Tortillas
      • 1/2 Cup Hummus (Any flavor, plain or horseradish is nice)
      • 1 Small Cucumber, sliced very thin (about 1/2 cup)
      • 1 Carrot, shredded (about 1/3 cup)
      • 1 1/2 Tbs Tamari (or regular soy sauce)
      • 1 1/2 Tbs Rice Vinegar
      • Black Pepper
      • 2 Small Handfuls Baby Spinach
      • Hot Chili Sauce/Tabasco, optional
      Directions:

      • Using a mandoline, or your food processor, or a sharp knife, slice the cucumber very thinly and place in a large bowl. Add the carrot. Add tamari and rice vinegar and toss. Let marinate 5-10 minutes (or longer, if desired).
      • Warm your tortillas so they’re pliable. You can microwave them for a few seconds with a damp paper towel, heat them in a dry skillet, or (my favorite) hold them directly over the flame of your gas burning stove.
      • Spread the tortillas with hummus, 3-4 Tbs each, making sure you cover the entire surface. This will help the sandwich stick together. Arrange the cucumber slices in one layer, slightly overlapping. Add carrot, and sprinkle some fresh pepper over the top. Add a layer of baby spinach.
      • Roll up the wrap, tucking in the ends, and place on a hot grill pan to slightly warm and create pretty grill marks. You can do this in a regular pan if you don’t have a grill pan. Slice and eat!
      Source:  VeganYumYum

      Monday, February 7, 2011

      Chocolate Chip Cookie Dough Cupcakes


      I'm pretty sure I mentioned it before, but in case you forgot, I am a cupcake fanatic.  I've had my eye on these guys for a while and the other day at the grocery store I was compelled to grab everything I needed to make these.  Speaking of grocery store, I find it funny that now that I am living on my own, I look forward to go grocery shopping.  Unfortunately there are not many Whole Foods or Trader Joe's nearby, so I usually have to plan to make a trip there.  But, luckily the bank I work in is in a grocery store, so I'm not that deprived.  I'm sure my love of food has changed my disposition about trips to the store, because as a child that was the one way my mom really drove me crazy.  Saturday trips to go food shopping.  Of course I thought at the ripe age of 7 I was more than mature to stay home alone (a kid mind is amusing), but unfortunately she didn't agree and dragged my brother and me along every single week.  (Although I'm sure she wished she could have left us home).  What's all the gabbing with the grocery store have to do with these cupcakes?  Well, like I've mentioned before, the way to my heart is through my stomach, and I loooooved that the Stop&Shop bakery gave out free cookies.  It's really too bad there weren't more freckle faced, red-headed children in my town or else I definitely would have tried going back for seconds.  I have always loved sweets, whether they were cookies from the grocery store or cupcakes coming out from my oven, I wanted them all to myself.  So, what better way celebrate a love for all things delicious then to combine the two!?  I know, sheer genius!

      These little guys are yummmmmmy.  If you're more of a vanilla cake person, go for it!  I assure you they'll knock your socks off either way.  For these I used a chocolate cake base and put a little surprise on the inside.  The cookie on top is just a teaser for when you actually take a bite and find an adorable, delectable little cookie dough ball inside.  Ahhhh-mazing!  They are topped with a basic vanilla buttercream.  Well, I shouldn't say basic.  By basic I mean easy and delicious, unfortunately vanilla has a bad rep for being "plain," but this is the perfect compliment to the cake, cookie dough, and mini chocolate chips.  I wish I could always have my house smell like it did after baking these (get on that, Yankee Candle).


      For the Chocolate Cupcakes:

      Ingredients:

      • 2 cups sugar
      • 1-3/4 cups all-purpose flour
      • 3/4 cup HERSHEY'S Cocoa
      • 1-1/2 teaspoons baking powder
      • 1-1/2 teaspoons baking soda
      • 1 teaspoon salt
      • 2 eggs
      • 1 cup milk
      • 1/2 cup vegetable oil
      • 2 teaspoons vanilla extract
      • 1 cup boiling water
      Directions:

      1. Heat oven to 350°F. Line cups with cupcake liners.
      2. Stir together sugar, flour, cocoa, baking powder, baking soda and salt in large bowl. Add eggs, milk, oil and vanilla; beat on medium speed of mixer 2 minutes. Stir in boiling water (batter will be thin).
      3. Fill cups 2/3 full with batter. Bake 22 to 25 minutes. Cool completely. Frost. About 30 cupcakes.
      Source:  Hershey's Perfectly Chocolate Cake


      For the filling:
      • 4 tbsp. unsalted butter, at room temperature
      • 6 tbsp. light brown sugar, packed
      • 1 cup plus 2 tbsp. all-purpose flour
      • 7 oz. sweetened condensed milk
      • ½ tsp. vanilla extract
      • ¼ cup mini semisweet chocolate chips
      Directions:
      • To make the cookie dough filling, combine the butter and sugar in a mixing bowl and cream on medium-high speed until light and fluffy, about 2 minutes.  
      • Beat in the flour, sweetened condensed milk and vanilla until incorporated and smooth.  
      • Stir in the chocolate chips.  
      • Roll into teaspoon sized balls.
      • Split the dough in half (some to bake, some to refrigerate)
      • Cover with plastic wrap and refrigerate until the mixture has firmed up a bit, about an hour.
      • Bake other half at 350 for 8-10 minutes.
      Source: Annie's Eats

      For the Frosting:

      Directions:
      • In a large mixing bowl, cream butter until fluffy. Slowly add in confectioner’s sugar, and continue creaming until well blended.
      • Add salt, vanilla, and 3 tablespoons of heavy cream or milk. Blend on low speed until moistened. Add an additional 1 to 3 tablespoons of heavy cream or milk until you reach the desired consistency. Beat at high speed until frosting is smooth and fluffy.
      For the Garnish:
      • Garnish your cupcakes with mini semi-sweet chocolate chips and a mini chocolate chip cookie.
      (Notes:)
      If you plan on garnishing the cupcakes, be sure to right after frosting or else the top layer of the buttercream will harden and the mini chocolate chips won't stick.

      Source: My Baking Addiction

      If you haven't looked at Annie's Eats or My Baking Addiction before you definitely should check out their blogs.  They are filled with delicious food and desserts!

      Thursday, February 3, 2011

      Rustic Bread and Eggplant Lasagna


      A lasagna with no lasagna noodles, you ask?  You won't miss them a bit!  No need to boil a big pot of water and worry about the noodles overcooking...just grab a nice loaf of artisan bread instead.  This is a great way to put a twist on a traditional dish and will definitely please any crowd you put a huge slice in front of (come on, who doesn't love a big plate of lasagna?).  Not feeding a crowd?  Neither was I, so instead I'll be enjoying this for days which makes great for leftovers to bring for lunch and for those nights when I get home late from work and am way too lazy to cook.  It's great because you can add anything you like to this dish..it's extremely versatile!  I followed this recipe exactly, but next time I'm going to add some zucchini, vegan mozzarella, and cashew ricotta to add some more of the traditional lasagna components.  This is one big lasagna as it is, so if you add more to it, prepare yourself for pulling a huge, delicious, and fragrant dish out of the oven...you may even need an extra set of hands to help out out! 

      Be sure to use a sourdough bread or any other thick, crusty bread that will hold up to absorbing the sauce so it won't all fall apart.  Have some day old bread on hand?  That will work out great too because it holds up nicely when slicing and serving.  I'm warning you NOT to use a regular loaf of bread or else it will just be end up being really mushy. 


      Rustic Bread & Eggplant Lasagna
      Serves 9-12

      Ingredients:
      • 3 Tbs Olive Oil
      • 4-6 Cloves Garlic, minced (optional)
      • 2 28 oz Cans Organic Tomatoes, blended
      • 2 tsp Salt
      • 4 tsp Dried Italian Herbs
      • Olive Oil, for drizzling
      • 2-3 Medium Eggplants, peeled
      • 8-10 Large Slices of Sourdough Bread
      • 1 Cup Breadcrumbs (or 2 more pieces of bread for toasting and food processing)
      • 1-2 Large, Ripe Tomatoes, fresh, for garnish
      • Basil, for garnish
      Directions:
      • In a very large skillet with high sides, or a sauce pan, heat the olive oil over medium high heat. Sweat the garlic for 1-2 minutes, then add tomatoes, salt, and herbs. Cook for 30 minutes (bubbling), stirring occasionally. Invert a mesh strainer over the top of the pan to prevent splatter, if desired.
      • Preheat oven to 400º F.
      • Meanwhile, prep two baking sheets with parchment paper. Peel the eggplants by slicing off the top and bottom and using the cut edge to start your vegetable peeler. Holding the eggplant vertically, cut the eggplants into 1/2 inch slices. Arrange in one layer on a baking sheet. Sprinkle with salt and drizzle liberally with olive oil.
      • Bake eggplant for 30-40 minutes at 400º, turning once, until very, very soft and browned in some places.
      • Spray both sides of each slice of bread with spray oil and “grill” in a hot skillet until browned on both sides. You can also simply toast the bread, but I think you get more flavor with grilling.
      • In a large baking dish (a lasagna dish), spread 1 1/2 cups of tomato sauce. Line the bottom of the dish with bread, filling as many as the gaps as possible without overlapping.
      • Place half of the eggplant on top of the bread, followed by another 1 to 1 1/2 cups tomato sauce.
      • Add a second layer of bread.
      • Add the second half of the eggplant, and all of the remaining sauce. Make sure that the bread is completely covered by sauce. Sprinkle breadcrumbs over the top.
      • Place fresh tomato slices on the top of the lasagna, sprinkled with salt and pepper.
      • Bake for 40 minutes at 400º F. Remove from oven and let rest 10 minutes before cutting.
      Note:  Mine wasn't cooked enough after the 40 minutes so I kept it in the oven longer and checked it every few minutes.  I ended up keeping it in for about an hour.  

      Source: VeganYumYum  (I definitely need to get the book, all of her recipes on her blog look and come out awesome!)  She also provides beautiful step by step photos for this dish.


      Tuesday, February 1, 2011

      Fauxstess Cupcakes


       Now, if you want to tell someone you love them, what could be a better way than to write it on a homemade hostess cupcake!?  I'm not sure about you, but it would totally win me over.  The direct route to my heart is through my stomach..and these knock offs are even better than the store bought kind.  Moist chocolate cake filled with homemade marshmallow creme makes for a delicious treat and these honestly cannot get any cuter! 

      The first time I saw these, I knew I had to make them.  A cupcake doesn't always have to be topped with a mountain of frosting to make it good (although it definitely helps), but the rich ganache topping with the light and marshmallow filling in these make for an amazing combination.  The folks at Hostess knew what they were doing when they crafted these, and the first person who decided to make a homemade version is truly a genius (it says a lot when you can make something better than the original).  And hey, you can really use any old excuse to whip these up...birthdays, the fast approaching Valentine's Day, just for fun..whatever your reason, these are definitely a must try!  Even better is that they aren't too labor intensive and the results are well worth the effort.  The true test will be your willpower while waiting for them to chill...talk about a challenge!  But, once the wait time is up and you take your first bite, you actually might die they are so good...but don't say I didn't warn you! 

      For these cupcakes I used Martha Stewart's "One Bowl Chocolate Cupcakes" because I knew I would be dirtying many more bowls than just this one.  This was my first time using this recipe and the cupcakes came out perfectly!  Afterall, Martha knows best.

      Cupcakes:

      YIELDS
      18

      Ingredients:
      • 3/4 cup unsweetened cocoa powder
      • 1 1/2 cups all-purpose flour
      • 1 1/2 cups sugar
      • 1 1/2 teaspoons baking soda
      • 3/4 teaspoon baking powder
      • 3/4 teaspoon salt
      • 2 large eggs
      • 3/4 cup warm water
      • 3/4 cup buttermilk
      • 3 tablespoons safflower oil
      • 1 teaspoon pure vanilla extract

      Directions:
      • Preheat oven to 350°. Line standard muffin tins with paper liners.
      • Sift cocoa powder, flour, sugar, baking soda, baking powder, and salt into a large bowl. Add eggs, warm water, buttermilk, oil, and vanilla, and mix until smooth.
      • Divide batter among muffin cups, filling each 2/3 full. Bake until tops spring back when touched, about 20 minutes. Transfer cupcakes to wire racks, and let cool. Cupcakes will keep, covered, for up to 3 days.
      And for the filling and frosting, I used the recipe from Annie's Eats.

      Filling:

      • 6 tbsp. unsalted butter, softened
      • 1 ½ cups confectioners’ sugar
      • ¾ cup Marshmallow Fluff
      • 1 ½ tbsp. plus 1 tsp. heavy cream

      Directions:
      • In a medium bowl beat together the butter, confectioners’ sugar, Marshmallow Fluff and 1 ½ tablespoons of the heavy cream until fluffy.  
      • Reserve ½ cup of the mixture – transfer the rest to a pastry bag fitted with a ¼ – inch round tip. Beat the remaining 1 teaspoon of cream into the reserved ½ cup of filling, cover and reserve. 
      • Gently insert the tip of the pastry bag about ½ – inch deep into the top of each cupcake and lightly squeeze in some of the filling.
      Frosting:
      • ¼ cup heavy cream
      • 4 oz. bittersweet chocolate, finely chopped
      • 1 tbsp. unsalted butter, softened
      Directions:
      • To make the frosting, in a small saucepan heat cream over medium heat until steaming, stirring constantly. Remove from the heat, add the chocolate and let stand for 5 minutes. Add the butter and stir until smooth. 
      •  Transfer to a small bowl and dip the top of each cupcake to thoroughly coat. Spoon the reserved filling into a pastry bag fitted with a very small plain tip and pipe curlicues across the center of each cupcake. Refrigerate the cupcakes for 10 minutes to set the frosting.
       
      For the vegan version, click here!